It’s show season! I love doing shows. Part party, part networking- they are a fantastic way to meet new friends, get in front of new customers, and connect with store owners. What is the best way to start? I am a firm believer in starting where you are. Every show you learn. Every show is different. Just get in there.
Once you are there, you are amidst a sea of other vendors. So, how do you stand out? Table and booth spots are a fantastic way to visually express your brand story without having to say a word. When people go to a show, they want to connect, however if every vendor is giving them the hard sell it would be really intense!
The more you can tell people at a glance, the more accessible your brand and product are to people. This way you can engage them in authentic ways that feel more like sharing and less like selling. How do you tell your tale? Materials, colors, props, style, patterns, and layout. You have so many tools at your disposal.
CONSIDER THE ESSENTIALS
Logo/ Company Name
-
Display this loud and proud! Use your logo- It is your biggest asset for brand awareness. People will connect it with you and your work. Create a display by hand with found materials, have a vinyl sign made, sew your logo, hand paint…. There are so many ways.
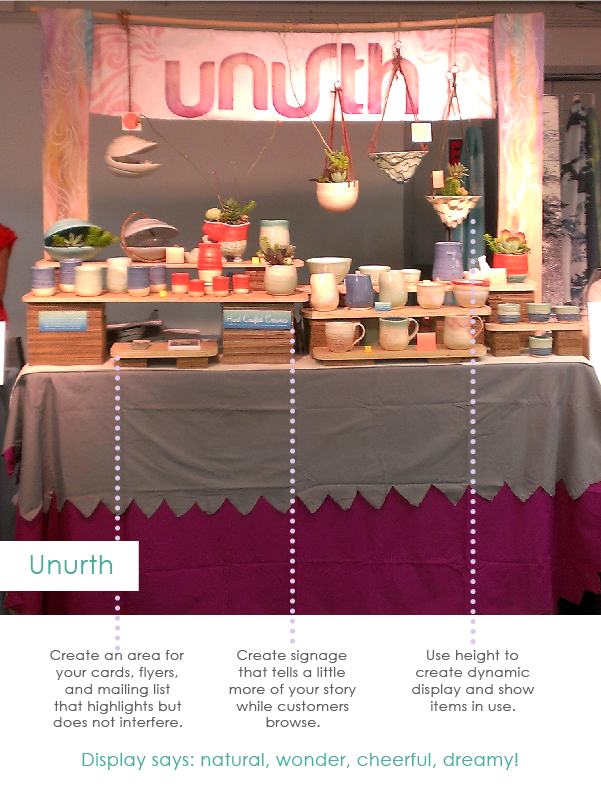
Display
-
Highlight your product. Surround it with materials that make it pop and tell the story. Use brand colors or colors that will set your work apart.
-
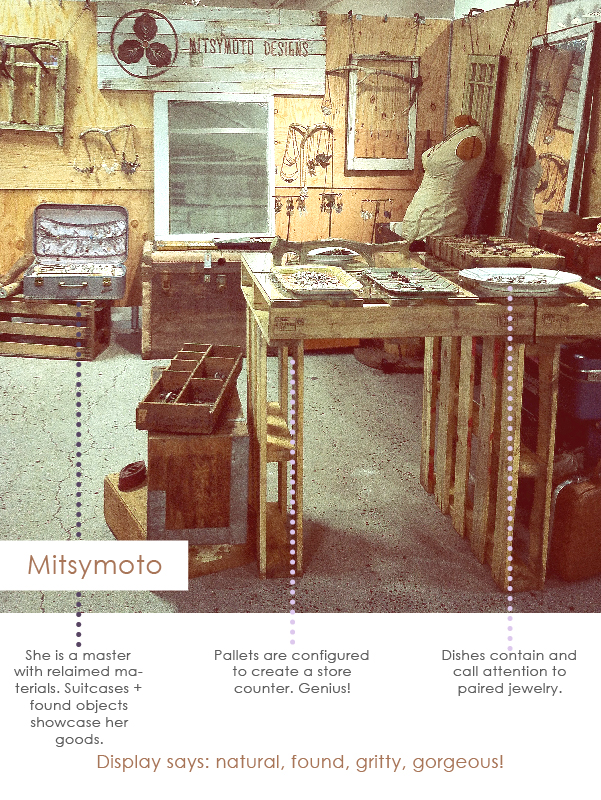
Consider your structure. Think outside of the table or box. Stack some crates to create your shelving. Build your own stand.
-
Think about how materials tell about your work and set the stage. I use light wood to pair with my ceramics, distressed says something very different.
Product (of course)
-
Make it lovely. Show examples how it can be used. If someone can envision it on them or in their house, you’ve caught their interest. Put a plant in it. Have it on you. Let them try it. Get them engaged!
Price Tags
-
How you do this depends on your items. However have it marked for you and your customers.
-
Make it easy for them to browse.
-
Highlight show specials and sales.
Descriptions
-
Tell a bit about your work in a way that helps the customers fill in the narrative.
-
A lot of work speaks for itself. For my ceramics, I like to tell a bit of the story. I use little blurbs from my web copy to tell where the inspiration comes from or how it can be used.
Promo Stuff
-
People love take aways. Help them remember you. Have something to hand out with product photos so they can(and will!) buy from you later.
-
Mailing list sign up. Build your list with people who want to hear from you.
Get inspired
-
Look around. Visit the show you are interested in doing. Learn (don’t copy of course) from what is working with others. Go to retailers with great display like Anthropologie who regularly uses DIY type materials to create amazing displays. How do your products look best?
-
Resources. Do some digging especially if you are trying to level up to the next stage of the game. Here are a few to get you started:
-
Instagram is an amazing resource to view trade shows without being there: #icff , #nss , #nyigf
-
-
Pinterest search terms: booth display, booth design, store display
-
Ask: How are they using materials? What type of setup are people drawn to? How are others using color, layout, signage to tell their story?
-
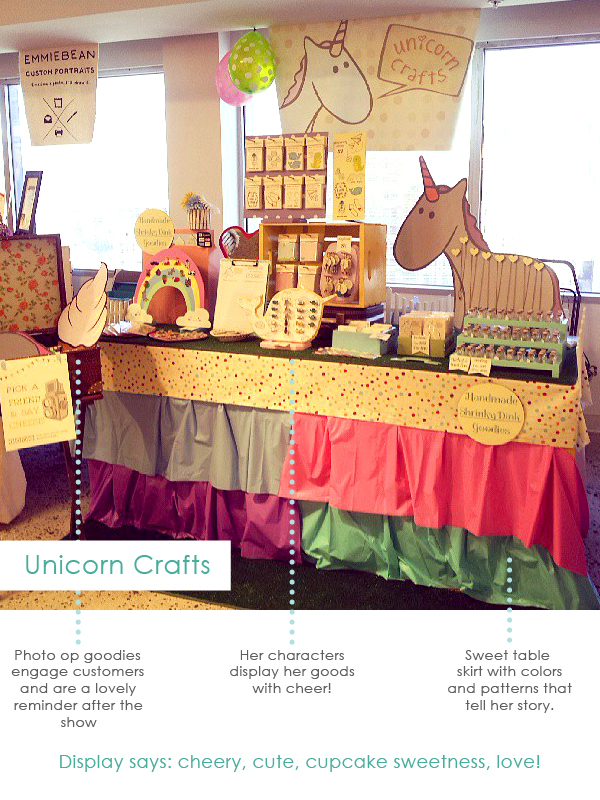
{ Unicorn Crafts booth display }
HOW TO MAKE AN AMAZING BOOTH
- Choose your words. Pick 4 words that say your brand and you want to capture in your display.
- Sketch it out
- Plan the build or arrangement
- Make it!
- Do a trial run. Put your product on it. Stand back. Anything you would change?
- Set up time and take down. Efficiency will be your friend. Try for a setup in about 2 hours for the bulk of it.
- Take a picture and look at it on screen. Sometimes for me translating it into 2D is just the separation I need to see what I want to change.
- Take a picture at the show and continually improve.
- How did people respond? Did they always want to know one thing or were confused?
- How was the composition? Did your eye flow through your display? Were colors strategically placed to pop? Is it too busy? Does your work need breathing room?
Pat yourself on the back for a job well done! Celebrate! Then make the change next show. Trust me, there are a ton of things I saw to change as I was doing this post!
Now go get em!
Owner and Designer Jenn Romero is a product designer by trade with a fancy for organically beautiful objects for everyday living. She is a California native in love with the pace and natural beauty of the west coast. Jenn’s calling is to design for the dreamer by bringing the spirit of the wonderluster home with her crafted ceramic objects.
What a brilliant post!And timely. Jenn, I love the wooden walls. Curious as to how these walls are constructed. Are they propped up in front of standard displays. I have very lightweight metal displays. Considering getting material sewn that go go over them….but I love this wood.
The setup for the booths at this show have solid walls that vendors can clamp and “attach” walls to. If you look close at the top of Mitsy’s booth, her walls are clamped on. However I have seen people construct wall situations in table set ups that can totally apply to booth spaces.
That wood look/recycled palettes would be so perfect for you Colleen! I can totally see your lettering hanging from wall panels like that. My nana had hinged wooden displays for taking to shows made of plywood so she could use them inside or outside depending on the show.
Ready to build Jess….xo.
Hey Colleen! The wood is clamped directly to the walls that were provided for us at the show. I used the clamps to not only secure the wood to the metal frame of the walls but also used it to hang my frames from =) You can also use this idea for smaller spaces. At my holiday booth I had a totally free standing display for my table space: http://www.flickr.com/photos/uniquelosangeles/8250736038/in/set-72157632187144166
My friends Woodbrain, Sea Glass Soul, and Meriebabie created a hinged system so their wooden wall was free standing. Check out a photo: http://www.flickr.com/photos/uniquelosangeles/8736941021/in/set-72157633474337730
Thank you Lauren…your inspiration heads to my dream board. I just hung a show recently and used twine. I loved the look and want to bring a rawness to my work that will make the colorful recycled materials pop even more. I plan to apply for a wholesale show that is in February…one of those moves that is a game changer. i am very excited to have this inspiration. I will post the finished product. Tried to add a photo here of the work on twine but couldn’t. Hmm.
great, useful info…thanks for sharing
Such a great post! It’s so hard to know how to approach booth and table displays for the first time, but planning ahead and doing a trial run at home is definitely the most important part for me – avoids those “big day” nerves and stresses. Jessika suggested I share a pic of my table displays so I’ve attached a couple of photos from my first two markets – comments and feedback are definitely welcome!
oooh Sarah! Looks amazing! Really clean, clear and bold display. I totally agree. Im a stressball the day of setup, so to make sure I am focused on the customers, I need to plan plan plan. Thanks for sharing!
Thanks so much! And yes, stressball would be a good word for me too on market day – the practice run always helps, and I always take a photo of the practice set up so I can just copy it on the day. I love your display too, nice height you’ve managed to get there!
YES great point. I do the same. That way no heavy thinking is involved on the say of!
I’ve seen Sarah’s display in person & her work + set up is lovely, lots of white space for the eye to rest & the colour in the work to leap out. I love the little graphic signs that tie in with the design & help tie the table together. I agree that making more of the vertical space would be great + it makes a bigger impression from far away, so important in a busy market!
Your display looks great! Where you want to go with it depends on you, your access to a shop, and how people react.
A couple of ideas: I could definitely see your booth going up, utilizing the vertical space similar to a card rack in a store. Or even a stand alone vertical display- no table with a place to checkout with you to the side.
Options are never ending 🙂
Thanks for the comments. Yes to the card rack! After my most recent market I decided I’d like that to be my next addition. Plus more variation in height on the table itself to break it up as most of my products are small. So many options, and so fun trying them out!
Jenn – This is so wonderful and congrats to you on your guest post at OMHG! This was soooo helpful to me. As you know, I’ve been thinking about doing some craft shows (even more so since we talked) and this is a WONDERFUL resource for anyone who’s looking to set up their own booth for the first time. I love how you included the pictures with the callouts on each one. So helpful. And your booth looked gorgeous!
Thanks Kim! I cant wait to see your display! 🙂
The first show is SO exciting (& scary!) there is so very much you learn by doing but this is an amazing resource to get your started, we should start up a craft/trade fair thread in the forums too!
I can imagine I’ll be shaking in my boots, but having all you fabulous people to get me prepared is definitely going to help 🙂
I bought items from Unicorm Crafts Recently, and I have to say that this post is accurate. Every little detail is very important. Thank you so much for providing so much information and great photos as examples.
These booths are amazing, move over boring craft tables :). You can do so much when presenting your products to the masses, but so many biz owners i work with stick with the norm and wonder why they did not have a busy sales day. I am all about standing out from the crowd and shouting it out just in case 🙂
Thanks for this wonderful and super helpful post. This is my first year selling at craft shows, and my booth is very much a work in progress and I work on figuring out branding and what message I want to convey to my potential customers. I know that it is going to evolve as the summer progresses, and I am going to use these pointers as I work on it for my upcoming shows.
I have been desperately wanting to do a craft fair but feel scared about the details. How much product do I bring? Will it even sell? And then there is the question of branding, banners, display and cost. This was helpful because it made me realize I don’t have to spend a fortune to order large banners and display pieces for impact. Duh, I am an Artiste after all! I can just make my OWN Fabric signage! I bookmarked this blog and posted the article to my ETSY “artsy crafty group”. I think so many of us will find this inspirational and useful. Thanks for putting it out there for us. Perhaps I will see some of you at my booth sometime!