You’ll need:
- self-healing mat
- large ruler/straight-edge
- rotary cutter (fresh blade!)
- pins
- sewing machine
- scissors
- thread
- fabric
- trim
- steam iron
- {6} half-yard cuts in different patterns to make 3 scarves. The busier, the better! For this particular method, I think it looks so much better to mix and match funky, bright patterns, rather than using anything close to solid.
- {1} yard of pom-pom trim. (This is a great resource for trims.)
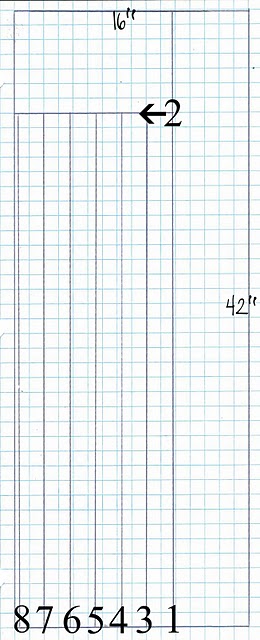
Here we go! The above graph shows how each half yard will be divided. (Each square = 1 inch.) Half yards should measure about 18″ (length) by 44″ (width). Notice the graph indicates 16″ by 42″. Yes, I took an inch off each side to allow for discrepancies. You’ll want to start with a nice, even, square piece of fabric. So start by evening out your edges!
Now… Each number represents a cut that you’ll make, in order.
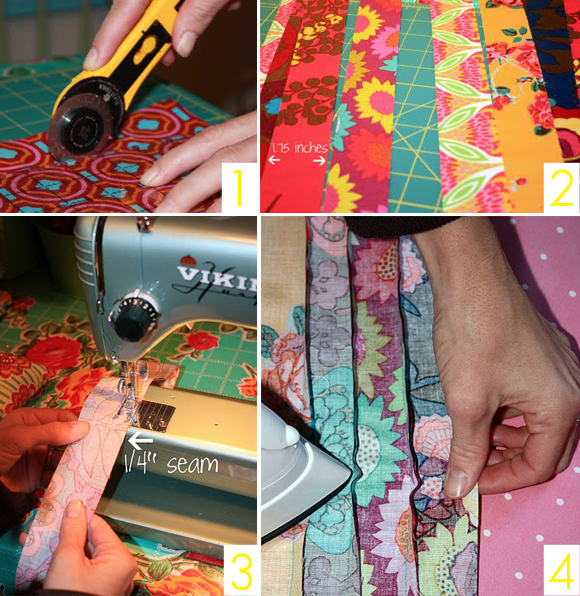
1. Time to cut!
For cut #1, fold your fabric in half very evenly to cut along the entire width, 5.25 inches from the right edge. You’ll end up with a strip 5.25″ x 42″. Set it aside.
For cut#2, rotate the remaining piece so that the 10.75″ side is on the right. Cut 7 inches from the right edge, creating a 7″ x 10.75″ piece. Set it aside.
This leaves you with a piece 10.75″ x 35″. Fold in half, making it 10.75″ x 17.5″. Starting with the long side on the right, cut a strip 1.75 inches from the edge. Repeat 5 times. Now you should have six 1.75″ x 35″ strips. Set them aside. Discard the 1/4″ piece leftover. Repeat the whole process with the other 5 half yards.
There should be {36} 1.75″ x 35″ strips. The other cuts are for the backing and ruffles. Put them somewhere safe & sound for the moment. Don’t let your 2-year-old “helper” cut them into tiny pieces.
2. Now, mix up your 36 strips.
In random order, you need to create 9 groups of four strips each. No group should contain two of the same fabric print!
3. Time to sew!
One group at a time, lay out your four strips (long) side-by-(long) side. Take the first two strips and pin right sides together. Sew along the long edge, making a 1/4″ seam.
Open, and pin the third strip to the second strip, right sides together. Sew.
Open, and pin the fourth strip to the third strip, right sides together. Sew.
Now your first group of four strips is all sewn together! Repeat with the other eight groups of four.
4. Time to press!
Your iron must be hot & steamy. Place your first piece of four-sewn-strips right side down on the ironing board (I use the floor). With seams facing away from you, steam as you ever-so-gently tug upward, pressing the seams sideways (not open). Do this as evenly as possible, or else your widths will not be consistent. Flip over and press again with the right side up.
Repeat with the other eight.
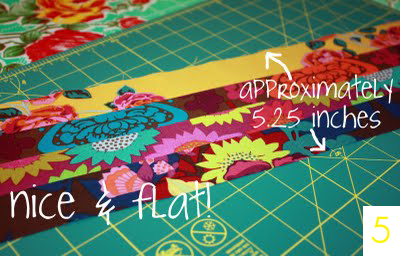
5. Now your nine pieces should look like this:
Everyone’s seam-sewing and ironing will be different, yielding different final widths. Mine is 5.25″. Since we cut the backing piece 5.25″, it shouldn’t be wider than that. But if your pieces measure narrower, pay special attention.
6. Back to the cutting mat!
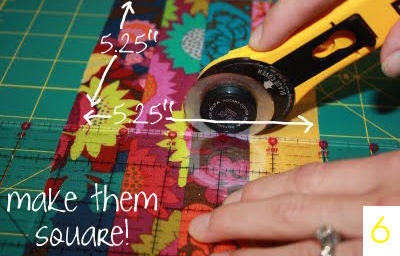
You will now turn the long pieces into squares by cutting along the length, using the same measurement as the width.
Since mine measure 5.25″ wide, I will also cut them 5.25″ long.
Got it? Make them square! If yours are only 5″ wide, cut them 5″ long as well!
Starting at the short end (make a clean cut first, as small as you can), cut your squares.
You should get 6 squares out of each piece.
7. 9 pieces times 6 squares = a total of 54 squares!
We will use 16 squares per scarf.
Randomly make 3 groups of 16 squares each.
(You’ll have 6 left over to use as you please! You can’t make the scarves longer, though, because the backing will only accommodate 16 squares worth of length.)
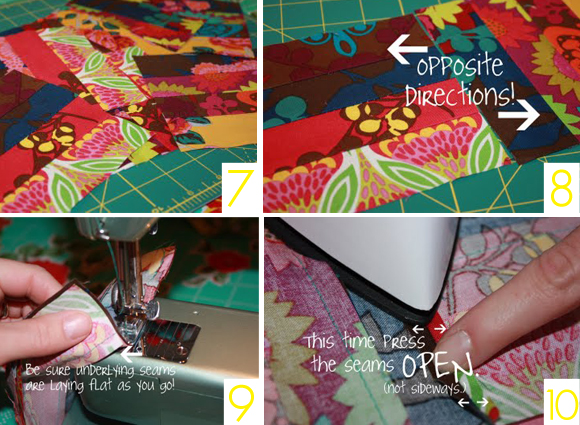
8. One group at a time, lay out the 16 squares, side-by-side, seams running in opposite directions!
The seams in square one should go west to east, the seams in square two should go north to south, and so on… back and forth…
Back to the sewing machine!
Now, just as you lined up the strips right sides together earlier, pin your squares right sides together, then sew your whole row of 16, one at a time, with a 1/4″ seam.
Double check that the seams are in opposite directions as you pin!
9. Because your seams are running in opposite directions, pay careful attention as you feed the squares under the presser foot. If you don’t check that the underlying seams are laying flat as you run them through, you will end up with twisted seams, which makes for a bumpy scarf. So feed carefully!
10. Back to the ironing board!
This time, you’ll press your new seams open, rather than sideways.
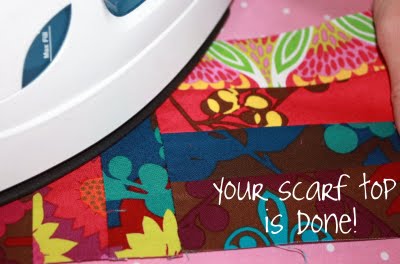
Flip & re-press. Repeat with all three scarf tops.
You did it!
Whoo-hoo!!! Almost done…
12. Squaring up your scarf top.
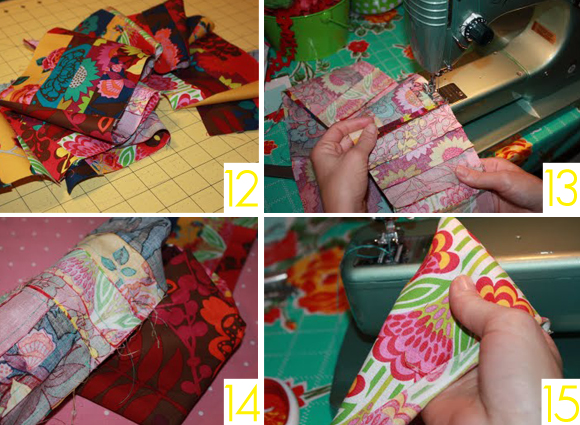
After piecing together 16 squares, the edges of your long piece are bound to be somewhat jagged. Using your rotary cutter, even the whole thing out the best you can. The width should be uniform, down the entire length. Also, even out the two short sides so that they are nice & perpendicular to the long sides.
Piecing together your scarf backing.
First, be sure your reserved backing pieces match the width of your top. Adjust if necessary. Now, measure the length of your top. Mine measures 76″.
Divide total length in half, to get ‘x’.
Add ‘x’ + 3/8″, to = ‘y’
{example: (76/2) + 3/8″ = 38 3/8″: length for each piece}With right sides together, sew raw edges (1/4″ seam) at the short sides to create one long piece, about the same length as your top.
{Remember to keep the slightly shorter pieces at either end, and the longer ones in the middle.}
Press the seams open.
13. Top and Backing become one.
Your backing should be a little longer than the top.
With right sides together, lay the top on the backing. Line up the short ends on one side, and get ready to feed the whole thing through the machine.
Sew along the entire raw edge (1/4″ seam) of one long side. Back stitch at the beginning and end. Leaving the short ends open, continue to the other long side, and repeat. You will have one long tube.
14. Flip the tube inside out, flatten, and press with your steamy iron.
While sewing, your fabric likely stretched a bit. If your open sides are uneven, just trim them. Turn inside each of the open ends 1/2″, and press.
Ruffle it up.
The last of your reserved pieces are for the ruffled ends.
They should measure 7″ by 10.5-10.75″.
With right sides together, fold in half lengthwise, so it measures 3.5″ by 10.5-10.75″.
Stitch along both of the short sides (1/4″ seam), leaving the long side- opposite the fold- open.
15. Flip it right-side-out, poke out the corners, and press.
Now, adjust the tension on your machine for gathering. I use #1, but you may want to experiment if you aren’t sure. Basically you want very little to no tension. Your stitch length for gathering should be as long as possible. Mine goes up to #4.
Along the open edge of your ruffle piece, use a straight stitch (1/4″ seam) all the way down. Do not back stitch. Leave yourself a nice, long tail of thread on either end.
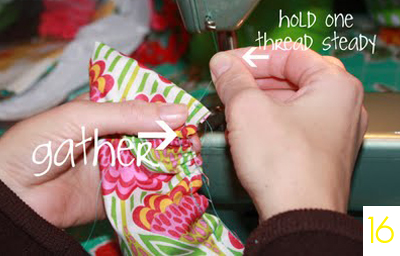
16. With one hand, hold one of the threads steady.
With your other hand, gather along the other thread, towards the middle of the fabric. Repeat on the other side until nicely ruffled.
{You’ll find that it’s easier to pull one thread vs. the other, depending on the machine. Holding onto the bobbin thread works best for me.}
17. Time to top stitch.
Find the center of your scarf, and load it into your machine at that point, top-side-up.
{Return tension and stitch length to normal.}
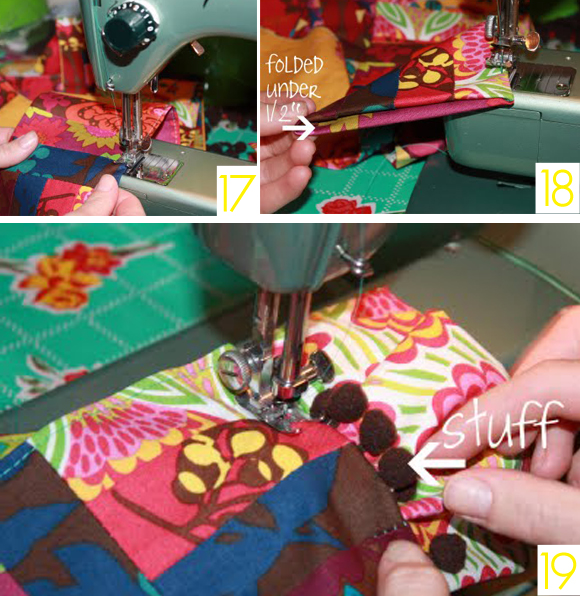
I usually like to use a 1/8″ seam for top stitching.
Start feeding it through down the first long side, back stitching at the beginning.
18. At about an inch from the short edge, secure the needle down, and lift the presser foot.
Get your ruffles and dingle balls ready.
They should both measure approximately the same length as the short edge openings (around 4.5″).
First stuff in your ruffle, raw edge first, until it’s tucked in nicely.
Stuff your pom-poms in right on top.
19. Put the presser foot back down and carefully stitch until you’re 1/8-1/4″ inch from the end.
Needle down, pivot the scarf a quarter turn, then slowly sew the open end closed, through all of the layers. Re-stuff as you go.
Once you’ve reached the end again, pivot another quarter turn, and repeat along all edges of the scarf, until you are back where you first started your top stitching. Back stitch to lock up.
Run that steamy iron over the whole thing.
Snip stray threads.
20. Wear and admire.
{or be nice, wrap up, and give away!}
And, by the way, a shorter version would make an adorable little girls’ scarf!
Thank you for scarfing along with me!


