by Michelle Vackar, Modern Handmade Child
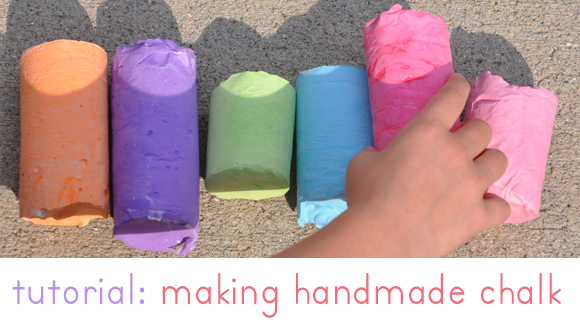
One of our favorite outside activities at our home is drawing with chalk on the driveway. You can play hopscotch, four-square, and of course draw and create silly stories. My daughters and I were talking one day as we played hopscotch about how to make chalk and I thought to myself, let’s try it! It ended up being quite a lot of fun.
What you will need:
• Toilet paper or paper towel tubes
• Scissors
• Duct tape
• Wax paper
• Small bucket or disposable container to make the recipe
• ¾ cup of warm water
• 1 ½ cups Plaster of Paris
• 2-3 tablespoons of tempera paint
• Paper bag or a “mess mat”
** we made six tubes of chalk – we simply doubled the above recipe.**
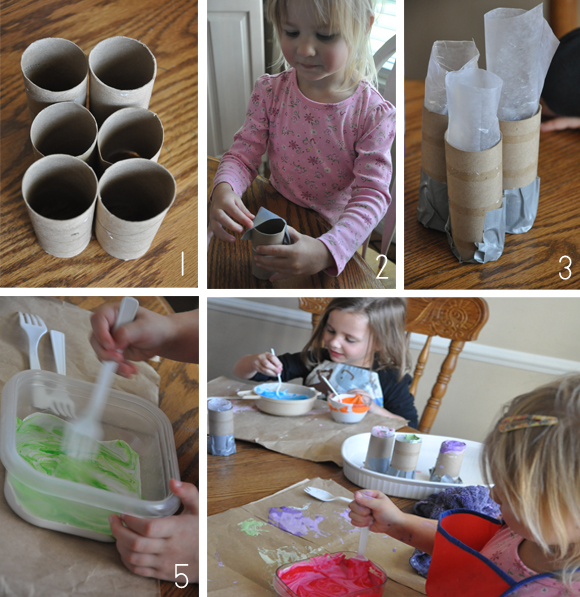
Step 1: If you are using paper towel tubes, cut each tube in half, so it is roughly the length of a toilet paper roll tube.
Step 2: Cover one end of each tube with duct table to hold the contents within.
Step 3: Cut as many pieces of wax paper as you have tubes. Roughly 6 inches X 6 inches. Roll the wax paper loosely and insert into the tubes so as to effectively line the tubes. The top of the wax paper will be higher than the tubes. The wax paper liner will keep the chalk mixture from sticking to the cardboard tubes and will eventually be peeled off.
Step 4: Pour the warm water into your bucket. Sprinkle the Plaster of Paris over the water and stir the mixture with a plastic spoon. The Plaster of Paris roughly starts hardening within 20-30 minutes, so you need to work fast so that it does not harden too quickly.
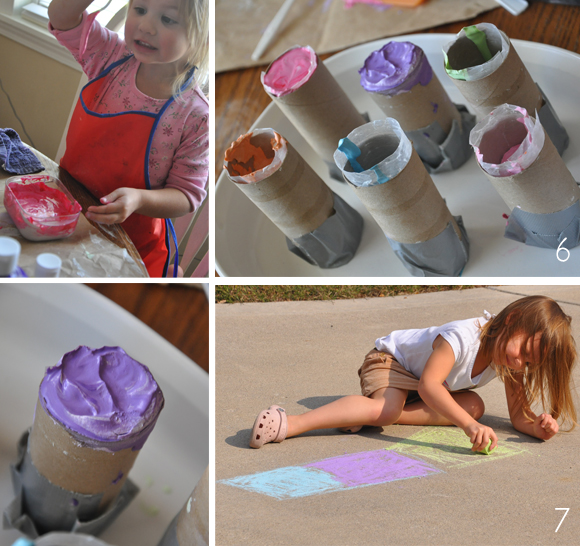
Step 5: Next you will want to pour the tempera paint into the Plaster of Paris mixture and stir so that it is mixed thoroughly. If you would like brighter colors add more tempera paint into the mixture. We wanted to make a variety of colors of chalk, so we spooned about 1/2-3/4 cup of Plaster of Paris in each separate container and mixed in the different tempera paint colors into each bowl. We ended up making six different colors and next time might mix more.
Step 6: Stand each tube with the tape side down on a cookie sheet/flat baking dish/box lid to make the project easier to transport to a drying location. Pour or spoon the colored Plaster of Paris mixture into the wax paper lined tubes. Lightly tap the sides of the tubes to release the air bubbles (so you do not have holes in your chalk). After you have poured the mixture into the tubes start another color. When done trim the excess wax paper so that it is closer to the cardboard tube.
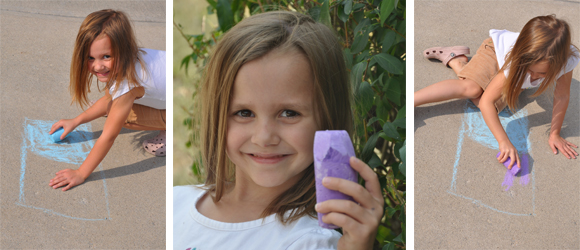
Step 7: It took 3 days for our chalk to dry. On the last day, we peeled off the duct tape so that the underside could dry. When the chalk dries, peel off the paper tubes and wax paper. Your chalk is ready!
Modern Handmade Child is a seasonal online publication celebrating handmade living in a new way. Our mission is to provide a fun and valuable resource helping families to embrace the handmade way of life, by intertwining the skills and values of days gone by with the trends and technologies of today. Our editors and contributors come together from around the world, including Europe, Australia, Canada, and many parts of the United States. Modern Handmade Child is published quarterly, and available for free at modernhandmadechild.com.
Well, i would never have guessed, thats how its made after all these years of buying it. Thank you for the recipe, I will surely try this out at some point, problably in the christmas school hols, the boys love making stuff.
Thanks so much for sharing.
Susie from
I Just Love That Fabric
Thank you so much !What a great idea!
? this tutorial! Wonderful way to incorporate art and play! I couldn’t help but share on my blog!
Annie from
?Crayon Couture?
It looks like making it is just as fun as coloring with it!! Can’t wait to make this with my kiddos!
Fun! Thanks for sharing!
I love this! I can’t wait to try it with my kids. It looks so much fun!
Beautiful tutorial! Love the sunny pictures! It might be a while before we can make it seeing as how the winter rain is setting in here in Seattle. I can’t wait to make it. I love to make homemade using things we already have, rather than buying new! Cool!
i’ve never seen a tutorial for chalk before! how brilliant! thanks for sharing! totally bookmarking.
Great! I will be making this at home and taking it to playcentre, I am sure this will be a hit with the kids there. Thought of making bi colour chalk by putting one colour in one end and one in the other, what do you reckon? Thanks so much for this post.
Hi, I am a new follower & I LOVE LOVE LOVE your blog!! Thanks so much for posting this, I can’t wait to try it 🙂
This is a fun tutorial! Thanks! I featured you on my blog!
http://aworldofcrafts.blogspot.com/2010/10/homemade-sidewalk-chalk.html
Why isn’t Crayola out of business…lol! Nice job.
I love how big they are- super fun! Thanks so much for this, I’ll be linking.
Absolutely love this & once you have all the supplies it looks so easy to make it in bulk! Thank you for sharing this fun tutorial!
LOVE THIS! Wow. I really enjoy seeing the process of making and applying art materials. I am currently learning a lot of making egg tempera, oils and chalk pastels. This project seems the most fun! 🙂
This is GREAT! Thanks for sharing!!
I would have never imagined how easy it is to make chalk. looks like its a lot of fun to make.
Looks like a fun project 🙂 Does the chalk wash off easily?
Thanks for sharing! Just thought of making chalk!
This is awesome! Totally going to make these with my little ones!
It’s gotta be done for my little ones
a nice summer activity! better put this on my list!
AWESOME! Thanks, can’t wait to do this!
Great idea. Thanks for the tip.
Thanks to my niece Christina for this link can’t wait to try this.
Thanks so much for this! We go thru TONS of sidewalk chalk so this will come in handy.
Please make sure you get a child safe plaster of paris. I unintensionally bought some once with a scary warning label.
Did you use the liquid or powdered tempura paint? Thank you!!
This has got to be one of the most useful and coolest crafts/tutorial ever! Your kids are cute too 🙂 I am going to share this in my “Have you seen” Friday post! ohh, and I am a new follower of course as well!
This was…what’s the word? Oh yea, AWESOME!!!
Love this! I’m thinking I might have to try this with my students..If I can get away with it!
Please be careful when cleaning up Plaster of Paris–you DO NOT want to pour this down your drain. Either use throwable containers to mix up your “chalk” or let dry in container and then break out later to throw away the excess. Got that tip from someone who learned the hard way the first time I made chalk.
Awesome! Wish I was a kid again!
Makes me wish I had little kids again 🙂 love your blog…so many great ideas! thanks for sharing…
I just came to visit from MomtothescreamingMasses. I’m amazed. This is Fabulous! My boys would love htis. Next step pave driveway. Anyone got instructions? We’re going to need a LOT of space!!!
WARNING: Plaster of Paris has been known to cause cancer.
Thanks for sharing this DIY! It almost makes me wish my guys were kids again too… sort of 🙂
I’ll have to try this out anyway (some of us just never grow up).
it is GREAT!!!!!
I’m really sorry to say this but I had tons of trouble with this recipe! 🙁 There was too much water and not enough plaster and it started soaking through the molds very quickly, which caused the molds to fall apart. I had to add extra plaster, and the waxed paper didn’t stay in place. Just wanted to let you know… love the idea though and love your blog… just wish this had worked out better! We might get usable chalk with what we managed, I’ll know in a few days! 🙁
Oh boo that sucks! I am sorry to hear it didn’t work out for you: ( Maybe try again & use less water this time? Good luck!
Great project! I just wanted to let you know that we featured this project on our Facebook page with over 13,000 fans. Wed love it if youd use our Featured Blogger button, available at: http://www.dailycraft.com/thank-you-for-crafting/. Our audience loved the project and we look forward to sharing more from you. Please let us know if you have any questions or projects youd love us to feature! Thanks!
Thank you so much for sharing! This post has sure been making the rounds lately-it really is a perfect summer project!
We have lots of projects that would be great for your site & I would love to share them with you: ) My sidebar space is limited to contributors & advertisers but thanks for sharing the button
great tips… 🙂
Hi! I am a Day Camp Co-ordinator and we are going to be using your tutorial to make homemade chalk next week for upwards of 120 kids!
I am just wondering if you used liquid or powder tempera paint.
Thanks so much for the great idea!
Wow that’s a lot of kids!!!! I suggest emailing the author of this post, Michelle at michelle@himamma.com with any questions since she has experience making the tutorial:)
Good luck!!!!
Oh no! Look up safe handling for plaster of paris before letting kids anywhere near the wet stuff. It can cause severe chemical burns, I believe from alkalinity. Looks like fun but please do read, and post, the danger and safety precautions.
Thank you for sharing Liz-I will do some research!
GREAT project! I found it on Pinterest and have included it in my weekly Pinterest round-up here: http://youareglowing.blogspot.com/2011/07/pinterest-for-diy-crafts.html
This is so cool! Great tip to remember for when I have children!
Sweet! Thanks so much for the recipe, I will make it this weekend with my 5 year old, she will love it!
refreshresytle@gmail.com
~Jenna, SAS Interiors
wait what? this is sooo cool! I will definitely make this with my kids. Thank you for sharing. It is so easy. Would food color work as well instead of the tempra paint?
This is fantastic ! Thank you ! I love these make and play activities
really fascinated idea , and creative activity for children’s ….. thanks
This is really great for a birthday party of my son! Thank you for sharing!!
Is the Plaster of Pairs used for this the dry mix?
I didn’t even know you could make your own chalk! But it is amazingly cool 🙂
the blue background on your page is worth mentioning!
This is a great science activity for studying states of matter! Thank you!
WOW … Great for kids… i dont have kids but when ever will have kids.i would love to make it for them..thanks for sharing.. I love making these kinds of things myself…I think i’ll make them for myself.. 😀
Fantastic, who would have thought I would come across an old friend’s website via stumbleupon?
Ha! That’s awesome Sarah-they’ve sent nearly 1million people to this one post pretty awesome that you found it via them too. Hope you & Patrick have fun making chalk!
wow thats so cool i want to try
Wow what a great idea. I’m going to make some as christmas gifts. I’m going to add this post to NZ Ecochick’s facebook page.
this is great! I’m sharing this with families on my facebook: http://www.facebook.com/growingmindscfdservices
keep up the great work!
This a great gift for kids to make for kids!
I’m not planing having kids too soon but I will definitely do this with them. I imagine this is something so great to do as it gets your kids closer to you. I don’t think there are too many family out there enjoying such activities and it’s such a pity.
Gonna do that for my kids!
Hi, plaster of paris can be toxic:
http://www.taxidermy.net/forums/MoldingArticles/04/041DF92AEC.html
Here’s a recipe that you can use instead:
http://www.essortment.com/crafts-make-plaster-paris-51564.html
It’s great for kids!
Love this!! Thanks for the tutorial..love,love,love and I’m making this for the grandkids!!
What is plaster of Paris? can I use any plaster?
Just as a note – saving a cardboard tube left over from gift-wrapping paper can do an entire project, it makes five-six tubes easy.
this is so neat!! totally going to try this this spring!
this is a fantastic idea! we just LOVE sidewalk chalk, so i know we’ll be trying this! 🙂 lisa
great carnt wait to make these with my boys thyll love it 🙂
this is so awesome! i’ll definitely be making this with my nieces. we’re linking to you tomorrow!
How fun…and what a great bunch of helpers/artists you have! I featured this today. Come by and check it out and to see the other projects I highlighted…
http://www.snugasabugbaby.com/toddlerartprojects/
going to give this a try but going to use homemade plaster of paris hope it works
Thanks for sharing
Michelle
Thank you for this. I host a lot of parties and I think that this might be a hit!
I don’t have time to look at all the comments so sorry if this has been asked but want to make sure. You took 1/2-3/4 cup of plaster at a time with less water or do you mix them all together and then separate out and add the colors? Hope that question makes sense 🙂 Thanks!
This is awesome, even better that kids could make them…I love the photos of the kids making them.
OH MY! My neice will love this! Its such a great activity! I never know what to do when I have my neice with me. I hate sitting her down to watch tv. She would think this is the coolist thing ever.
visit my blog at http://www.borntobeblonde.com
xoxo
THAT LOOKS REALLY FUN! 🙂 to write with:)
I loved this! I found you on pinterest and just want to thank you for you your wonderful ideas! I am going to do this with my kids this week 🙂
Keep up the hard work!
PS- I did a blog post about this on my blog. Here is the link. http://www.kinderkeepsakesblog.com/2012/02/giant-sidewalk-chalk.html Thanks again!
That is an awesome idea! CHalk is great way to keep kids busy for quite a while:)
I loved the way you explained how to make sidewalk chalk. As a teacher of early years, I have to draw numbers or number line at the backyard of school. So I will try your recipe.
OMG! This is FANTASTIC!!! Thank you so much for sharing this recipe and I especially loved the photos of your little ones making their chalk themselves. What an inspiration! YOU ROCK.
That is such an awesome project! I will definitely be trying this with my daughter. She loves crafts and she loves coloring our driveway with chalk so she will really love this! Thank you!
Liquid or powder tempra?
I’ve made these and they are great! Love the pictures and easy instructions! Found this great blog on StumbleUpon! Thanks for posting!
http://www.helium.com/items/2288274-how-to-make-homemade-finger-paints
Could u use acrylic paint?
Super easy, VERY awesome! LOVE it! http://mummydeals.org/category/simple-crafts/
I also use plastic ice trays, all kind of shapes, so fun for my pre-school and grandchildren
Is this easily washed off the footpath/pavement? Btw great idea.
I made these in a daycamp with inner-city kids. Instead of TP tubes, we used disposable bathroom cups. With fewer kids, we might have gone with the 5 oz. kitchen cup size. It worked as a group craft because even though it had to be stored overnight, their names could be written on the cup, and the next day they could take their chalk out and use it in the parking lot during their outside time. We pre-measured the plaster into snack-bags, and assistants at each table helped them measure the water, and they chose their favorite color to mix in (using popsicle sticks). We found that the more tempera we added, the more extra water there was in the mixture, and I thought that might happen, but I couldn’t get powdered tempera color as well as pre-mixed, so I took a chance. After camp we just poured off extra water from each cup, because the plaster had settled by then.
I wouldn’t use acrylic paint for color. Better food coloring than acrylic. It would tint the plaster just fine, but it could leave residue on the sidewalk, because acrylic is plastic-like.
Plaster of Paris recipe:
1 of 3
In a mixing bowl combine one cup of warm water for every two cups of flour.
2 of 3
Mix the flour and water until there are no lumps remaining. The finished paste should be smooth and creamy.
3 of 3
Bring your Plaster of Paris to where you will be working immediately so it will not cool down.
When I made this the plaster paris measurement was way off. I sprinkled it little by little into the warm water. It was to the right consistency at around 3/4 cup and it set way faster. I had to make each chalk separate because it set so fast. My kids couldn’t even help. The first batch was a mess because it hardened so quick, and I did the measurements exactly.
I made this last night and I had to cut the ingredients in half to have the whole mixture fit into one tp roll….otherwise the ingredients listed above would make upto 2 tp rolls.
Amazingly easy – I love it! I also love the size of the chalk. Perfect for little hands to grip. thanks for sharing
That is so awesome! I love the colors, they’re so vibrant. I’ll have to try this with my daughter. 🙂
Love this idea
I would love to try this with my children but I am concerned, is this washable? Off of the sidewalk as well as their skin/on clothing?
Basically, does it come off with just soap and water just like the stuff at the store?
Melissa, since it’s just tempera paint & plaster of Paris, it should wash easily. Tempera paint is the same paint kids use in kindergarten, & anybody who has had an old-school cast can tell you what water does to plaster of Paris. Have fun with it. :O)
Love this idea. I am also a D.I.Y.er with kids. Thanks so much for sharing. I will give it a try.
I did this with the kids today, the first 2 went good. The 2nd set we did were hardened before we got them in the toilet paper rolls! We couldn’t use them. The first two we did were ready to use with in 15 min. I made the kids let them sit for awhile longer, just to make sure. Thanks for the idea, I love it and will be playing around with this for a while!
do you think these could be poured into candy molds to make smaller chalk animals, flowers, etc? or would it end up drying up too fast?
Wow, so much fun for a few pennies. I can see where kids would have as much fun making the chalk as in using it. The color possibilities are endless. Thanks.
Any plaster in the bucket from the last batch will speed the hardening time, as will warmer water or more stirring. Use very cold water, sprinkle in the plaster until little peaks form and get wet at the water’s surface but do not stir until you get to that point. Plaster can burn with chemicals and the heat generated by setting. Take care.
great work for kids 😉 Funny colors http://www.cigs4girls.net/
I know this is like a totally different recipe, but can I use food coloring instead of tempera paint, and flour instead of plaster of paris? lol and a cereal bag (the one that is inside the cereal box) instead of wax paper? I want to use things I have in my house.. THANK YOU!!
This is such a great idea, and sounds like a fantastic project to have fun with this summer. Excellent job!
This is wonderful! I can’t wait to try this with my boys. I have to wonder if I can’t make them bars instead of round by making partitions in a lined box. We buy about a box of chalk a week in the summer!
So I just tried this with my pre-school class and it was a complete and utter disaster. The plaster dried almost immediately and it was very, very messy. Mess is fine though, we are in pre-k after all! I think next time I might try it with metal cookie cutters on a wax paper sheet, because even with the wax paper, somehow the TP rolls were still crumbling. Obviously, I’m not as coordinated as you! Your girls are beautiful, by the way!
Such a fun project, especially when kids get involved throughout the process!
What a great idea, Michelle! I would have so much fun doing this with my nieces and nephews.
Glad I stumbled upon you..Fun idea! I can see my sister making this with her kids!
Natalia asked if she could use food coloring – food coloring is often indelible. It will stain hands, clothing, and sidewalks. As they say on every cleaning product, you should try it in a very small batch first on an out of the way area.
My kids are now in their late teens, and I did this with them when they were in preschool (learned the hard way about using the waxed paper. If you forget it, the tube will stick, but if you are patient and have sturdy thumbs, you can rub it all off). another fun option is to use the jello molds that they (used to) give away free periodically at the grocery store. I have used egg shaped ones and hot-wheels car shaped ones. Great fun!
If my kids were younger, or if I had grandchildren, I would absolutely make this. Such fun!!
This is VERY COOL, I can see my 2 year old grand daughter having a field day with this. Art is such an important part of kids lives they need a way to express them selves. Something home made like this also teaches kids (and the parent) they do not need to have something in a fancy box to have fun.
Thank You for sharing- Harry Symonds – Dad & Grand Dad- 3 girls
Beutifull idea, beutifull pictures! Thanks for sharing.
Brilliant. I will definitely try this at Messy Church
Great idea. I will definitely try this at Messy Church. the kids will love it.
Is this more cost effective than Walmart’s 20 sticks for $2.50?
I’m looking to save as much in as many ways as possible!
My son could go through chalk in 3 weeks if we play outside everyday, weather permitting.
I doubt it is cheaper-certainly a heck of a lot more fun though:)
Does it matter if you use the liquid tempera, or does it have to be powder?
Any teacher (such as myself) would love this for their kids to use at recess time!
This is amazing!!! Love it!!
We loved this so much we just featured it on a new segment of our blog http://www.larslovedesign.com/2012/06/18/weekly-craft-roundup/
Since some have said that it dries to quickly and getting into the tubes can be messy, how about putting each individual color into a zip lock bag, mix the color right in there (thus no air getting to the plaster) and then cutting a corner off to fill the tubes? I’m going to try it that way & will post the results. Wish me luck!
Good luck Nancy! Great idea, let us know how it goes & be sure to share photos of the end result!
Sweet! I’m going to send this to my sister! My niece and nephew will love it!
We made this chalk today. Instead of using the toilet paper rolls, I went to my local hardware store and had them cut PVC pipe (1-1/2″ in diameter) into 7″ sections. (a 10 foot section of this pipe is only $5.50) Instead of lining them with wax paper I used disposable bottle liners for baby bottles. (the kind that are pre-formed and have the ring at the top) They fit perfect into the tube. All of this worked great until I tried testing one to get the liner out of the PVC tube. My husband had to tamp in on a brick outside to loosen it up and then push the end of the chalk with the handle of a tennis racket!!! But, they came out! I then sliced open the bottle liner so the chalk can cure for the next several days.
Love this for the kiddos and will feature on our blog and Facebook! Check us out: http://www.thinkrsvp.com!
I am a genealogist and I use white sidewalk chalk when taking pictures of old weathered gravestones so the engraving will show up. I have trouble finding just white and I was wondering how soft this chalk was. It needs to be pretty soft to not damage the stone, but this would be much better than buying tubs and only using the 1/5 of the chalk that is white and pitching the rest.
You shouldn’t rub graves. It is illegal in some states because over time it always damages them. Thats why the graves in Salem are almost unreadable. It is far better to do a plaster mold and then rub the replica.
where can you buy the plaster? just at walmart? is it in the crafts section?
Not to be a bummer, but I think plaster of paris isn’t safe to inhale in its powdered state. That leaves me to think that using is as chalk would expose children to a lot of its dust in addition to the powdered form they mixed in the beginning. The warning label on a box of plaster of paris reads:
WARNING! May cause eye, skin, nose and throat irritation. Do not get in eyes. Do not get on skin or clothing. Do not breathe dust. Harmful if inhaled. Handle with care. When mixed with water, this material hardens and then slowly becomes hot. DO NOT atempt to make a cast enclosing any part of the body using this material. Failure to follow these instructions may cause severe burns that may require surgical removal of affected tissues. When mixing or sanding, dust may cause irritation to eyes, ears, nose and mouth. Prolonged inhalation of excessive amounts of dust will have adverse pulmonary and respiratory effects. Over exposure may cause lung damage. Contains crystaline silica which can cause cancer.
Plaster undergoes a chemical reaction when it sets, so unmixed plaster powder and the powder from broken up set plaster are 2 different things and will have different risks.
That said, anything that creates a powder that can get into your lungs is dangerous – but I’m pretty sure set plaster IS chalk, so there is no greater risk from this than from chalk you would use anyway.
The powder you create when writting with chalk is fairly fine, but it isn’t as fine and prone to go up in clouds as un-mixed plaster powder.
I am a sculptor and I often work in plaster. If i am chipping or scraping back on a plaster sculpture with rasps, which creates some plaster dust, I don’t worry, however if I sand set plaster – which creates a very fine dust – I wear a face mask.
I am not a health and safety expert, so please do your own research on this, but I hope this helps.
Yeah need to try this out, looks like a lot of fun making it and me and my son spend a lot of time going through chalk, playing wars and drawing stuff. Awesome thx, much appreciate your information.
I was going to say pretty much the same thing as the other commenter brooke said. It’s my understanding that plaster of paris isn’t good to “play” with. This is a great idea, but would be cooler if something else could be used instead of plaster of paris.
cool idea thanks for sharing
Hi!! I am from Argentina and love the idea to make it with mu kids… but I do not know what Plaster of Paris is???
Can You help me???
Thanks a lot!
Flor
Acá se conoce como Yeso parís!
this is a cool idea, i will certainly try this out with my children at school, never know it might save me a lot money which we can use for other resources.
thank you for this and it’s always good to try out new things……
I would hope plaster of paris is not that harmful to children considering that places such as walmart actually sale in and advertise it in boxes for childrens crafts
also with the plaster of paris many people use this to make casts including ones for their faces… There are many different types of plasters that can be purchased and some of them are strictly for construction type work and those are sure are very harmful but I’m sure the ones sold for crafts are not
I AM SO DOING THIS WHEN MY GRANDS COME FOR SPRING BREAK…
DOES FOOD COLORING WORK?
WAS THINKING OF NEON FOOD COLORING
& ADDING THE GLOW IN THE DARK MEDIUM FOR OUR LAST NIGHT FUN NITE
I saw something like this but we used cornstarch instead must I must say they take forever to dry & set up also we used cupcake pans
I did this last summer and they dried so hard that they barely wrote. Did I add too much water (or not enough)? I would love any tips you could give…
Plaster doesn’t need air to set, it is an exothermic reaction (releases heat) and putting it in bags won’t slow the reaction. I am a sculptor and I use plaster a lot. Things that speed up the reaction are mixing in too much (creates kinetic energy) and sometimes the paint you ad, especially if you add lots will make the reaction go quicker. You can add things to plaster to slow down the reaction but I can’t remember what (alcohol speeds it up). I would suggest mixing smaller quantities and using as fast as possible.
Sprinkle the Plaster of Paris over the water and stir the mixture with a
plastic spoon. The Plaster of Paris roughly starts hardening within
20-30 minutes, so you need to work fast so that it does not harden too
quickly. http://www.strikingly.com/luckystrike
Added this to a blog post I wrote and cited you: http://longtermcarelink.wordpress.com/2013/11/18/easy-and-inexpensive-christmas-gifts/ Thank you for blogging some great crafts!
Im a clown, I would rather head over to cvs and hit the sidewalk in about 5 minutes but thats just me.
The only thing that I find more frightening than a clown, is a lazy impatient clown. But kudos to you for being efficient.
Honk-a honk-a
This is brilliant! Can’t wait to try this with my LO. 🙂
CAUTION: DO NOT DO THIS! Plaster of Paris contains crystalline silica, which is a SERIOUS INHALATION HAZARD. It’s almost as bad as asbestos!
Regular chalk is made from calcium carbonate, and will not affect your child’s lungs when he breathes the dust created while drawing.
No it doesn’t. Plaster of Paris is gypsum, gypsum is calcium sulfate dihydrate, and contains no silicone, or silica.
(Though if you get old enough plaster of paris, really really old, it may have been mixed with silica or asbestos as a strengthening agent, as was done with many ancient plaster mixes and alabasters, but if you’re buying it new, that’s not going to be a problem.)
do you consider the current brand DAP at many stores to be a so called old enough plaster of paris as it does indead contain crystalline silica!!! http://householdproducts.nlm.nih.gov/cgi-bin/household/brands?tbl=brands&id=4008094 oh and as far as gypsum have you looked at the warnings for that material?? http://nationalgypsum.com/products/..%5CFile%5Csds01307.pdf
Google it. Wikipedia it.
http://en.wikipedia.org/wiki/Plaster#Gypsum_plaster_.28plaster_of_Paris.29