by Sara Tams of sarah + abraham
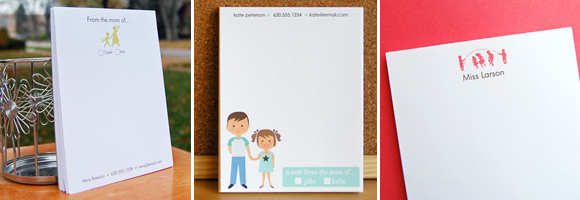
I began offering personalized notepads at the end of 2008, and they quickly became my best selling product. In fact, my teacher notepads and a note from mom notepads are currently the #1 and #2 most popular items on my website.
If you’re not already familiar with how to make your own notepads, I bet you’ll be surprised to learn how easy they are to make!
1. First I cut an 8.5″ x 11″ chipboard pad into fourths for the backs of the notepads.
2. Next I stamp the back of each chipboard sheet with my sarah + abraham stamp.
3. I print the design 4-per-page on 8.5″ x 11″ paper and cut those into fourths.
4. I stack 42 sheets of paper on top of each chipboard sheet, and then I stack all of the notepads together. I tap each side of the stack of notepads onto the table one or two times, always ending with the top end of the notepads before setting them at the edge of the table to be glued.
5. I had considered buying a padding press like this one, but I never got around to it. So here I am, hundreds of notepads later, still using heavy boxes or books to weigh the pads down (which has actually been working just fine!). Next I brush on two coats of padding compound, letting it dry completely between coats.
6. Once the final coat is dry I gently peel apart the notepads and package each set in a clear plastic sleeve.
A few additional tips:
- I sell 40-page notepads, so I always make each notepad using at least 42 sheets in case I need to remove the top one or two sheets. Sometimes excess glue will build up on the top sheet, or some of the chipboard sheet will stick to the top page of the notepad below it.
- Always double-check that you’re gluing the correct ends of the notepads. It’s so frustrating to print, cut, and glue an entire set of notepads (or multiple sets of notepads!) only to realize when the second coat of glue is dry that you’ve glued the bottom end. I’m embarrassed to admit that’s happened to me on more than one occasion!
- Be sure to line up the edge of the notepads as close to the edge of the table as possible, and also line up your weight as close to the edge of the notepads as you can. Use as little glue as possible so you have very thin coats of glue. Both of these things will help prevent the glued end of the notepads from getting “wavy”.
- I haven’t been able to find padding compound online in a smaller quantity than 1 quart (which will last for several hundred notepads), so I buy lots of small plastic bottles from a craft store to split it up into (they’re similar in size to travel shampoo bottles).
These are the cutest little pads. Well, I now know what project is next on my list. Thanks so much for sharing Sara.
Love this! I’m imagining party favors, stocking stuffers, birthday presents…
wow, you make it sound so easy…. maybe i’ll be brave enough to try it one of these days. thanks for the tutorial!
I love this tutorial, I made several for friends! Thanks for sharing!
Never knew how simple these were, thank you!
thanks for sharing! these are going to make great party favors!!
Totally agree Chonte, how simple these look to make, thanks Sara!!
This is such a great tutorial. I’m going to do this to recycle my daughter’s school work from last year. Hello stocking stuffers!
Paper Source has a 16oz container of PVA (polyvinyl acetate). They suggest using it for notepads. Does anyone know how it compares to the padding compound?
Thank you thank you for this, Sara! And please tell me if this better priced compound is the same quality? http://www.sizzix.com/product/657
This is great! Featured you on my blog: http://aworldofcrafts.blogspot.com/2010/11/personalized-note-pads.html
Thanks so very much for the tutorial on DIY notepads. I’ve always wanted to make my own, however I never knew how. Your steps were user friendly, and I appreciate you taking time to share this with beginners like me.
Tamika
Well bless your heart for sharing this tutorial. I am a paper fanatic, and I always wondered how you make them. Just a little glue and chipboard, and voila!
I’m so glad you were the first search result on Google =)
Thanks!
awesome tutorial and i will be sure to use it {{at some point}}:)
happy day to you luv,
gina
Wow, who would have thought I could actually do this? Thanks so so much for sharing!
This is amazing! I have customers who want notepad sizes I can’t find with the print company I use for my cards…so this excites me.
what kind of ink are you using? Do you have an industrial printer with ink that doesn’t run?
Thank you SO much for sharing this post and for your creativity. I love notepads and would love to create them for my clients, and never did because printers charge so much for them. Now I can do as many as I want, however I want.
These are so adorable! Any tips on how to cut the paper very precisely? Do you just use a regular paper cutter?
Hi Amanda! You could use a paper cutter for a perfect cut or an exacto blade with a straight-edge ruler & just cut a few sheets at a time.
I didn’t know it’s that easy and you clearly outlined the steps 😀 This is great.
How do you get all your fourths cut to exactly the same size? I’ve gone through about 4 notepad stacks trying to get the cut just right but it always just seems to be a tiny bit off. Thanks.
i found a place that sell smaller quanity of adhesive
they say you can color it also
the crafty pc
If you take your printed pages to Kinkos, they have a machine that will cut them evenly– It’s $1.49/cut. (They can cut the chipboard at the same time!)
Wow its perfect i was making a notepad for my mom for mothers day and i couldn’t figure out how to get it together on to. I will have to try it.
Thank You so very much for your post. I love it. I’m going to try and make some of my own post its.
i ant to ask a question what did you use to print the design on the back of the paper and where can i get all the materials from
yeah imwant to try it so where can i get the material and what did you use to print the design on the blank paper.
what is padding glue please???
Thanks Sara this was great and it really helped
I love those prints! They’re wonderful. I soo love notepads. They keep my hands busy!
nice post
hi if you guys want to order personalized notepads, personalized receipt, etc… please email me @ imsah97@yahoo.com…
That’s pretty awesome. I had no idea personalized notepads were that easy to make! How do you make the individualized designs though?
A very nice tutorial on print notepads.
thanks for the tip but i want a yarn notebook because in the philippines a lot we use are yarn notebooks
Wow! Those notepads are so cute. I like its design; simple yet so attractive. It is also great that you have shown steps on how to make those notepads. Thank you so much for sharing this. I hope you can share more DIY projects. -http://www.notepadsyourway.com/
Note Reminds My college days
Note Pad reminds my past and now at present I’m working on Bridge Pad compound
Hello! I have some questions that has been lingering on my mind for quite some time.
1. What did you do to keep the design of the pad aligned or the way it’s supposed ti be placed?
2. Did you print some crop marks with the design also?
3. Could you do a video tutorial starting from printing to cutting so I could visualize it clearly?
I’d really appreciate if you could answer my questions. I’d really want to perfect my notepad making skills too just like you! Thanks!
Thank you for all the tips. I just ordered padding compound and chipboard from your links! The padding compound link is broken, but I found somewhere else online quickly. Thanks again, can’t wait to make my pads.
Jen
Hello Literacy
What paper cutter do you use to cut your stacks of paper? Thanks!