by Edyta Szyszlo of Edyta Szyszlo Photography

Hey everyone! Happy Spring! I’m going to cut right to the chase… light is everything in photography. Like the sun affecting your daily mood, light does the same in a photo. If you don’t control it just right, your products will look drab, dreary and unappealing. Heather (owner of Bundled) emailed this photo to me asking for advice on how to make it look less dark and shadowy. Here we go…
Light is everything, did I say that already?! Your life will be easier and more efficient if you learn the techniques of simple lighting. In exchange you won’t depend on Photoshop as much. You’ll hear many people say “oh, we can just Photoshop this”. Sure, you could, but you’ll also spend hours trying. Heather’s photo is a great example of why you need balanced light while you’re shooting.
Just by looking at the photo, I can see that she didn’t use an on-camera or shoe-mount flash but had a tungsten light source (studio light or lamp) coming from the left side. The light is so bright that it creates a flash-like look (she may have turned off the flash if using a point & shoot camera). While her products are nice and bright, the dark shadows give off an amateur vibe.

Unfortunately, when you have harsh, contrast-y shadows, there’s really no way of eliminating them in Photoshop. Instead, you’ll see a very pixilated, noisy image with banding on the shadow’s edges. As you can see, this happened above after adjusting the ‘levels’ using this technique.
My advice for this photo is to reshoot it. When photographing products, you do want to show some sort of shadow in the form of soft light or else it appears to be floating. The key is mastering in-camera and environmental settings, only using Photoshop as an extra enhancement if wanted. So let’s train your eyes to see the differences in common lighting situations.

First, take note that all images are original and straight out of my camera. I’m using a professional camera (Canon 5D Mark II with a Speedlite 580EX II shoe-mount flash). I realize many of you may be using point & shoots (you can still use these techniques), but I will stress that purchasing an SLR camera is worth every penny for your business. You don’t need a super fancy or expensive camera – SLRs these days give you a lot of bang for your buck. (That’s another post!)
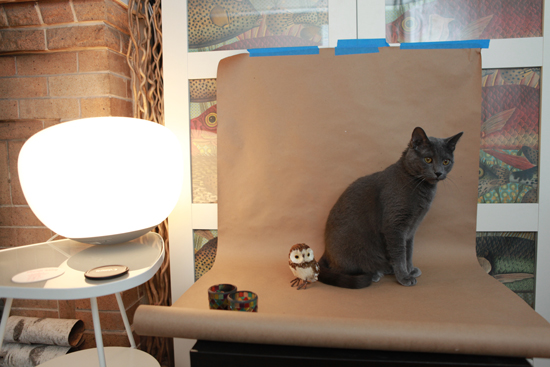
I did set up my photo area to replicate what many DIY photographers might be doing (see last image at the end of this post). All the photos had the same settings with the exception of what’s noted for each.
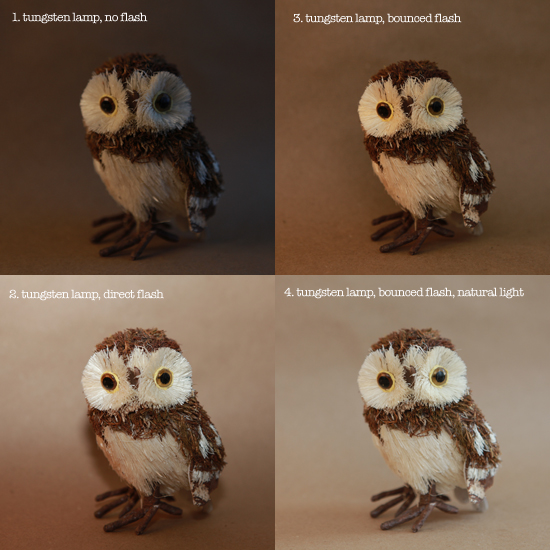
What is tungsten you ask? Artificial light sourced from household bulbs or halogen. It gives off a warm tone as you can see in #1. Heather’s photo has similarities to #2.
So how did I eliminate that harsh shadow on the left-hand side of the owl in #2? Bouncing your flash! Instead of your flash directly facing your subject, you turn it to face the opposite direction. The light from the flash bounces from the wall and creates an ambient glow. Only works with shoe-mount flashes or studio flashes (which you can rent!)
You do have to be careful with the distance and color of the wall behind or to the side of you (wherever you bounce) since both will affect the image. You may also need to change your flash strength manually or set to ETTL.
Basically, you’re creating what a strobe and umbrella perform like in a studio setup. If using studio lighting, diagrams are also available to help give visuals on where studio lighting equipment is set up. I didn’t want to get too technical since I know we have a range of photo experienced readers, but here are some to check out. #4 reflects this technique combined with soft natural window light (shaded not full sun) creating a close to perfect image.

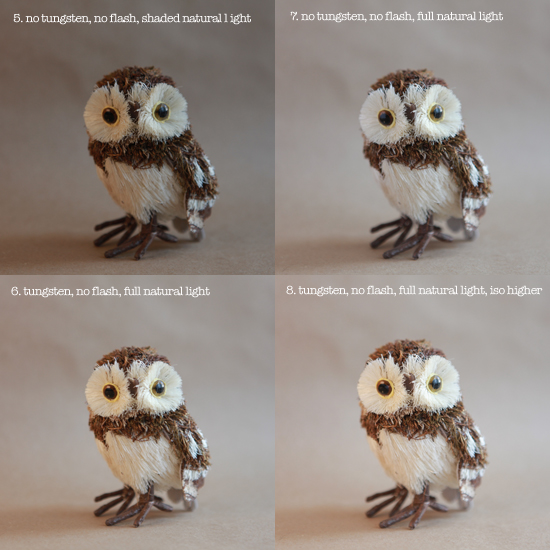
Now take a look at the owl with no additional flash but with variations of natural light. If I could shoot an entire catalog in natural light, I would! Natural light (or creating it) is extremely important for image tone, color and overall image balance. As you can see, the tungsten lamp is adding warmth (more obvious when looking at the owl’s left eye). #4 and #7 are both good reflections of balanced lighting – one a bit warmer than the other but that’s personal preference mixed with your need for accuracy.
Remember what your vacation photos look like when you’re facing the sun versus under a shaded tree? It’s the same concept – bright sun is your flash, which usually creates harsh shadows, therefore, you never want to use direct sunlight.
There are other factors in achieving the proper lighting such as your camera settings: shooting mode, exposure, ISO, etc. to other equipment used diffusers, fills and reflectors. But being able to know the whys and how-tos of basic lighting will help make those other things easier to understand. Start with shooting automatic mode to learn how the camera’s light meter works and move your way into manual exposure mode, turning your flash on and off. Practice makes perfect!
Most importantly, I was able to create 2 great looking images without Photoshop! It’s key to being a successful photographer and having successful products.

This is the environment that I shot the owl in… nothing fancy!
I think it’d be fun and inspiring to use readers’ products for future posts. If you’d like me to spruce up one of your photos, or if you’d like to send one of your products for me to photograph (I’ll ship it back), contact me at info@edytaszyszlo.com. I’ll select one item or photograph per month and blog with a lesson to be learned right here at Oh My! Handmade Goodness.

