As a kid, I was a very enthusiastic flip book fan; I could play with those small illustrated books for hours, trying to figure out the sequence. I think I have the same feeling when I watch modern flip books now, the same awe and desire to understand how the process is done. Allow me to present to you the stop-motion or stop-animation process. Here is the latest one I have done:
You may have seen them in big video productions or witty ads. It is, seriously, one of the easiest and creative ways to make a short film. You will need a camera, a tripod if you want your frame fixed, an idea and loads of patience!
So for those of you who have always wondered how to do one of those witty animations, here is a simple guide.
1. Brainstorm your idea.
Trust me, you’ll want to have your idea before actually doing a photo shoot. It will save you some time in the end! Go for a simple idea, something easily understood. If you can explain it in one or two sentences, then it’s a keeper! Try going for a second degree idea, you know, how do you illustrate something without actually plainly saying it?
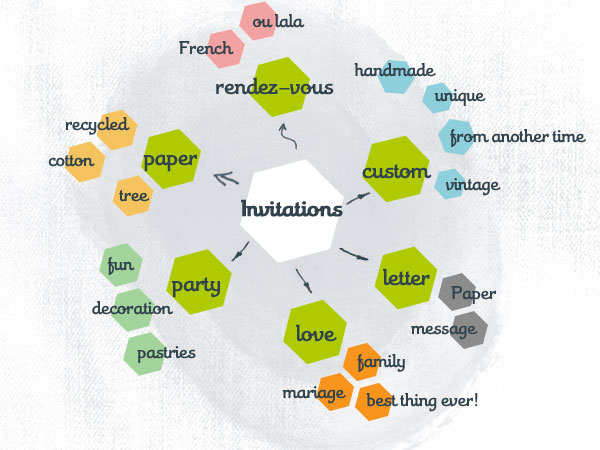
One of the many brainstorming techniques I use is that I will do an association diagram with words. So you start with a word, then think of 10 words related to it, then 10 words related to each ten words, then you go on until you are hungry or in need of a dictionary. This can be done with a friend; two heads are definitely better than one in this case!
2. Scenario
Once you have your idea, you’ll want to trace out the scenario of your masterpiece. You can illustrate it or just put it in a story or in a list. Don’t fuss too much about it though, this is a tool to keep your head clear once you start, not the actual work.
3. Prepare your shooting space
In my film, I use my chalkboard wall and my son’s chalk, my camera on a tripod and Chéri’s finger on the release. There was a table and a lamp here which I removed. I waited for the light to be just right in the afternoon (ambient sunlight is really nice). Be prepared with the technical things so your energy will be used for creativity, which leads me to…
4. Sometimes accidents make things interesting!
So even if you are prepared, maybe the camera will slip and the angle will be weird, or you will forget a chalk and leave the framed angle to go get it.
5. That being said…
All you have to do, or make someone do, is to hold the release button for as long as you want. Have your camera mode on the Sports / Action Mode for a quick shoot. And experiement! Try out different lighting, try different modes, with or without automatic zooming, with or without your flash. Creativity is finding out stuff, so be adventurous, and don’t be scared to mess it up! If you are like me, aka VERY shy in front of the camera, then you will find this technique very forgiving on your self esteem 😉
6. Now you’ll need your patience.
When you are done shooting then the editing begins. Download all of your photos on your computer. I edit and resize the pics in Photoshop, Now, I know that you have a gazillions of pictures taken, and editing every one of them manually seems very daunting. Let me introduce you to the world of Actions and Batch Processing.
Actions
In Photoshop, actions are pre-saved steps to doing something. It could be recropping, it could be a fancy cross-process technique, it could be anything, and the very good part is that if you do a quick google search (ie: free Photoshop actions) you’ll find plenty for your taste. Here is a link with the how-to install a photoshop action.
Batch processing
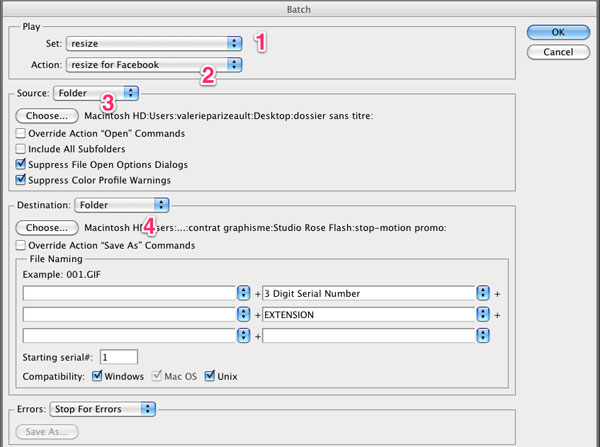
Once you figured out what style you wanted visually, then you will want to have all of your pics in that style. To use your action in batch mode, go to File -> Automate -> Batch.
- Choose a set
- Choose an action in that set
- Choose which folder the pics are coming from
- Choose a folder where the pics will be saved. I recommend that you create a new folder here so that you always have your original pictures if you ever change your mind :)*if you have recorded an Open or Save as in the steps of your action, then click on the Override Action «open» Command and Override Action «save as» Command.
7. Your images are pretty, now you need to actually do the editing.
I use iMovie, but you could also use Flash, or even Photoshop. I’m sure that there is plenty of software for you PC users as well (StopMotion Pro , there is a trial version I think). But for this DIY, let’s look at how it’s done in iMovie:
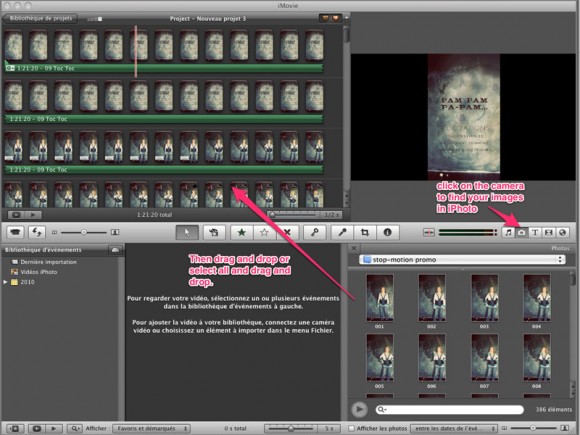
So basically, you need to load all your pictures into your project. Hit the camera button and find your images on your IPhoto (or any folder). Then select them and drag and drop them in the project zone.

Once they are all there, you need to tell iMovie how long the pictures are supposed to appear. In order to have a fast paced film, the pictures will appear only a fraction of a second (else you will have a slide-show, not a stop motion film!). In my video, my pictures are set to 0:05, so that’s 5 frame per photo (Time in iMovie appears in “0:00″ format. The number before the colon is the number of seconds and the number after the colon is the number of frames. FYI, iMovie usually plays at 30 frames-per-second). Still with me? Good! Now select all your pictures, and click “Show Photo Settings” and type in “0:05″ for your duration in the floating window that appears. Click the Apply button. Once it’s done, click the Play button.
Amazing huh?
8. Fine-tune, Publish and Share
So once your movie is done, you may want to add music (click the music note button to search trough iTunes, or create something with GarageBand), and maybe slow some frames, or even add your illustrations (I added my illustrations on my photos in Photoshop. Remember me telling you you needed patience?). You can also add text and fancy credits at the ending.
Then once you are done, Share>Export the film
I like to export my film in the Large option, and upload it to YouTube or Vimeo, it’s easier to share them in social medias afterwards. Then share with everybody you know and celebrate your creativity. You made a short film! That is something!
9. Questions?
Got any questions for me? I will gladly answer them in the comments below! If you have made a stop motion yourself, I would LOVE to see it! Please share with us!


