

It wouldn’t shock any one of you to hear that great product photography equals more online sales. Period. If you run an online business, you simply can’t afford to have poor images of your products. But how do you consistently create stunning images?
Here are some tips to help you move forward:
Tip #1 – Take your camera off Auto Mode
If I could convince everyone who owned a digital camera to do one thing, this would be it. I know that digital cameras, especially advanced ones, can seem completely overwhelming. So it begins to feel like the camera is smarter than you … and I assure you, that simply isn’t true! In auto mode, you have zero control over any settings, which results in zero control over your images.
The images below were taken at almost exactly the same time; the one on the left was taken in Auto mode, where the flash fired, which definitely lessens the professional look of your photos! The image on the right was taken in Program mode, and the flash was avoided. It’s easy to see which image would sell more products!
Takeaway tool: A great first step is to put your camera in Program Mode (look for the “P” on the top dial of your camera), where you control just a few of the most important settings, without being overwhelmed to manipulate every setting.
Tip #2 – Change up your composition
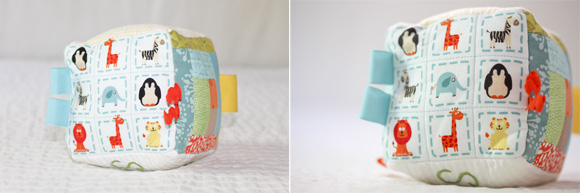
There are so many creative ways to compose and stage your images, but let’s start with one of the most fundamental ideas: instead of centering your subject, place it off to one side. This instantly creates a dynamic energy in the photo, and the shot will draw more attention, and more attention equals more sales!
The shots below both benefit from great lighting, and a simple background. But the image where the product is off to the right draws your eye instantly, and really pulls your attention.
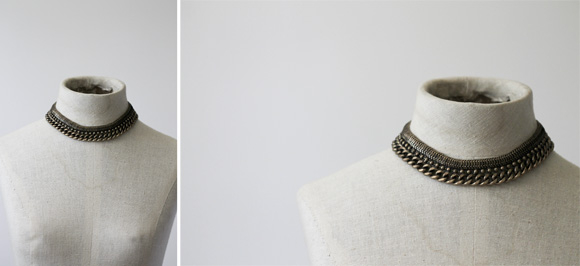
Takeaway tool: Next time you’re shooting, consider changing your angle or position to create interest and energy in your still product shots.
Tip #3 – It’s all about light
You want stunning product photography? Find and shoot in fantastic light. I’ve heard many of my students claim that their house simply doesn’t have any great light … and I always respectfully disagree! Any home with windows has the potential for great light – it’s just a matter of timing your shoots to utilize that light, and positioning your subjects to take advantage of the light.
For instance, the shots below were taken in the same room, with the same set-up … the only thing that changed was the time of day! (For those curious, the photos were taken 9am, 3pm and 7pm respectively.) Isn’t it incredible how varied the light can be in the exact same place? I recommend taking a day to test your light – set-up in the morning, and then photograph every hour or two. It should be clear by the end of the day what time works best to shoot!
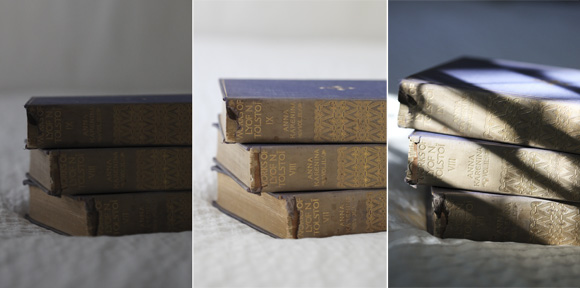
A big mistake with natural light that I often see photographers make is assuming that just because a shot takes place near a window, the image has utilized beautiful light. Unfortunately, there are lots of “wrong” ways to use this light! In the images below, see how placing the products in front of the windows resulted in lots of shadows.
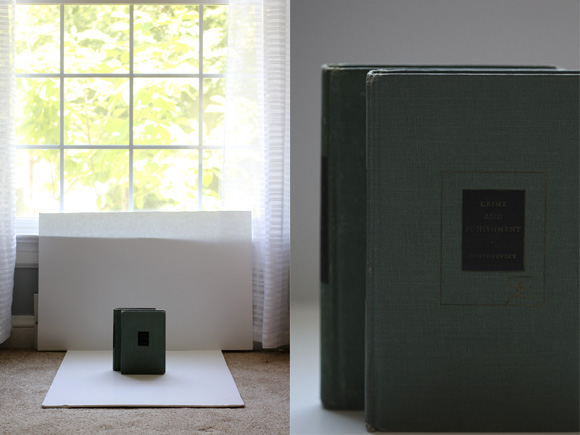
 Instead, try placing your products in front of the window light. This will allow you to actually benefit from the soft, diffused available light. See how different the shot below looks? All of the fantastic details and beautiful colors are brought out because of the light that now has a chance to fall on the products.
Takeaway tool: Be mindful of both the time of day you get the best light, and also how to position your products to take advantage of the best possible natural light.
For quick reference on what windows might get the best light in your home:
- North facing windows have the weakest light intensity. Try to find windows that face a different direction!
- South facing windows get strong, beautiful light. Position your products in front of these windows, and you should have a great start to your product photography!
- East facing windows get gorgeous light in the morning, so that’s a wonderful time of day to shoot with these windows.
- West facing windows get fantastic afternoon and evening sun, so if you can only shoot at the end of your day, look for some of these!
Remember, photos sell products … and the better your photos, the better your sales! Keep experimenting: with your camera settings, composition and lighting, and you’ll find every product shoot your photography gets stronger (and so will your bank account!).
Do you have any questions about how to improve your product photography & general photo skills? Share your questions + tips + before & after photos in the comments and we’ll all chime in!
 Meet Monica of Flying Photo School

Monica B is a photographer, entrepreneur and momma to the sweetest little boy that ever lived (not that she’s biased). As the founder and lead instructor of Flying Photo School, she has taught thousands of camera newbies how to properly harness the power of their digital cameras. Her latest dream is to make sure that every mom feels confident capturing life through a lens. She loves eating out, but you can expect it to take her 15 minutes to order, as she is the pickiest eater on the planet.
WEBSITE || TWITTER || FACEBOOK
[…] Need help with your product or finished object photos? These tips will really help the look of your shots, no matter if you’re selling on Etsy or just posting your WIPs to Ravelry or Facebook. Part of the Camp OMHG series, these tips from Flying Photo School really make sense. http://ohmyhandmade.com/2013/camp-omhg/basic-photography-survival-tips-for-creative-entrepreneurs/ […]